Monday, June 28, 2010

Stracciatella Semifreddo

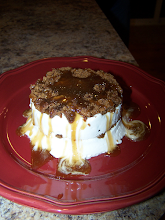
I don't know how to pronounce it but i do know how to eat it!!! And it was nummy!!! A great dessert for summer... cold, creamy, nutty and just the right amount of chocolate! This dessert requires lots of freezer time so plan ahead.... another thing learned from experience!

It melts really fast so it must be ready to eat when served!

Start off by toasting Hazelnuts in the oven... i had a hard time finding hazelnuts and once i did they had the "skins" on them but after toasting they came right off! (Don't mind the very ugly looking pan.... it has definately seen better days!!!)

Next grease the inside of a bread pan and then cut parchment paper in strips to fit the pan. The parchment paper overlaps and makes taking the dessert out of the pan a breeze.. see pics at the end.


In food processor combine biscotti and toasted hazelnuts... love the food processor, it makes life so much easier!!


Add melted butter and pulse until the crumbs are moistened.


Using a spatula, press the crumb mixture into the bottom of your prepared pan.


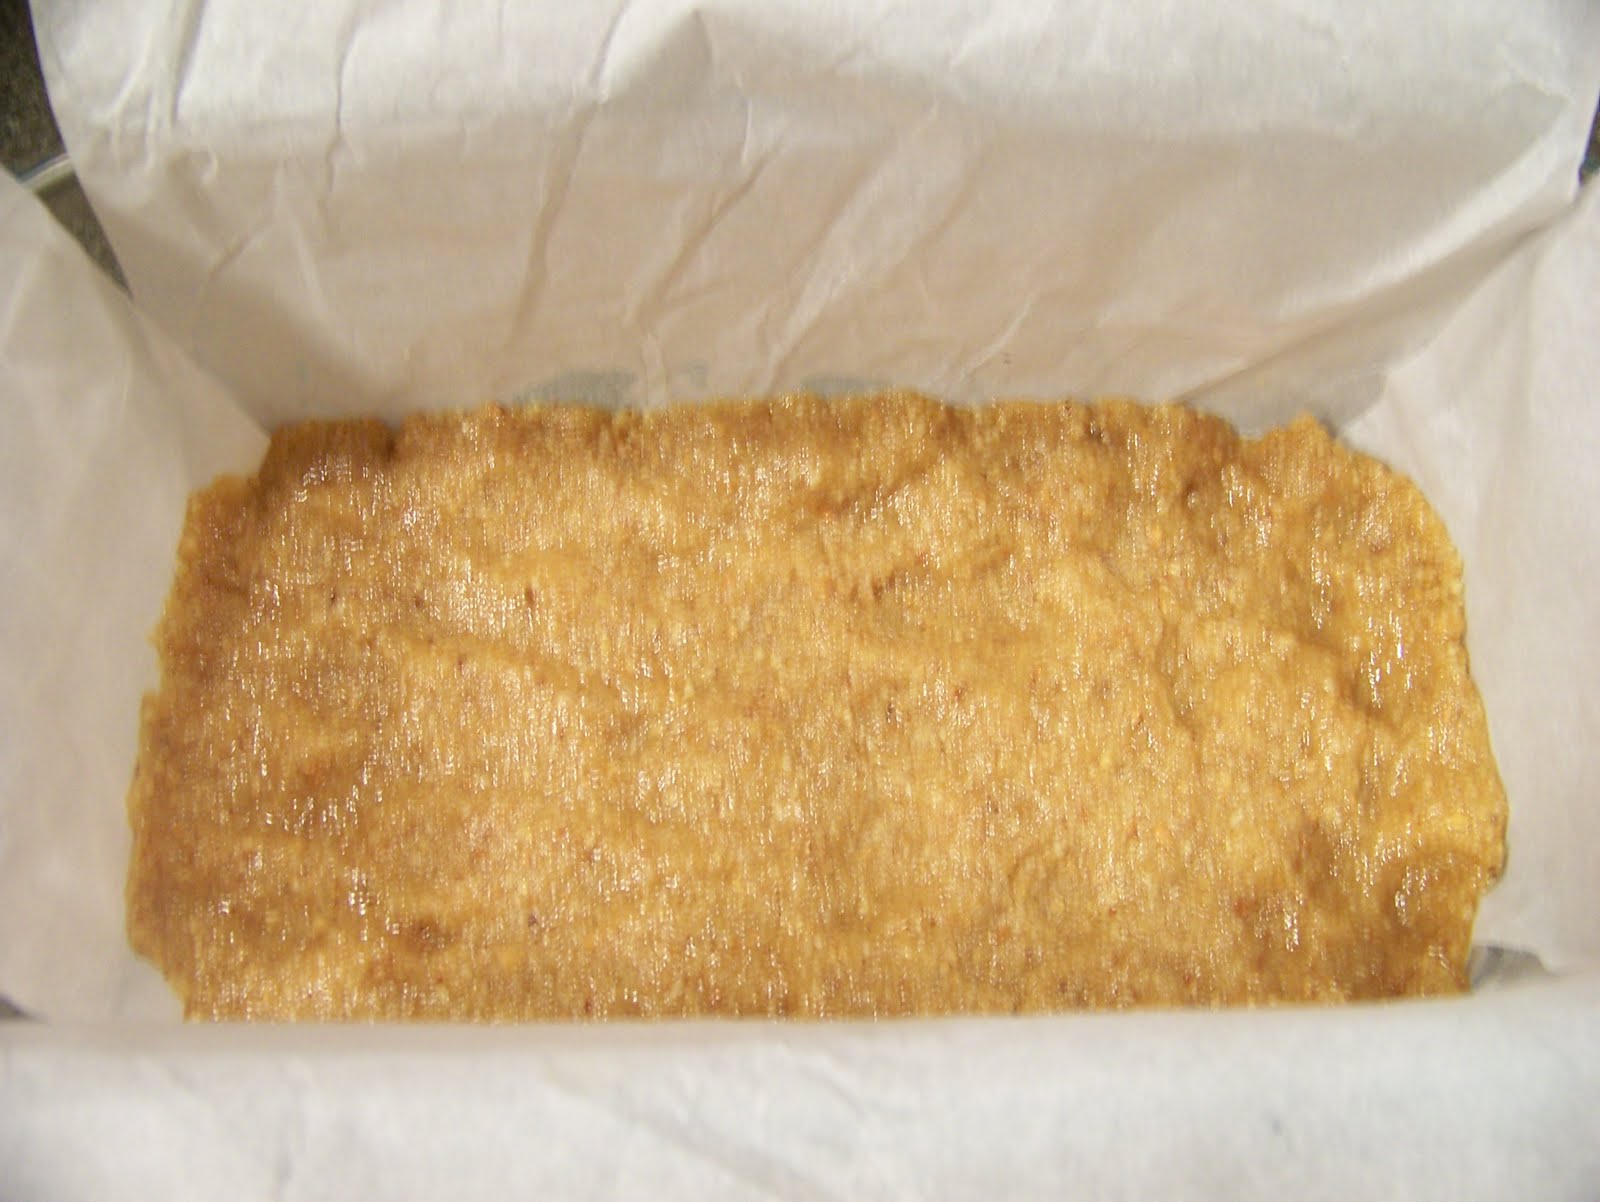
Bake for 8 to 10 minutes or until golden brown. Cool on wire rack for 20 minutes.


Now it is time to start the filling. Separate 8 eggs yolks.


Whisk together egg yolks, sugar, vanilla extract and salt until smooth.


Transfer mixture to a glass bowl and place over a pan of simmering water, making sure the bottom of the bowl does not touch the water. Whisk until the egg mixture is pale, thick and creamy and a thermometer reads 160°, about 10 to 15 minutes.


Put the bowl into a larger bowl of iced water to cool completely.


In another medium bowl, beat the cream until thick. Add sugar and beat until the cream holds stiff peaks.


Mix 1/4 of the cream into the cooled custard. Using a spatula, gently fold the remaining cream into the custard.


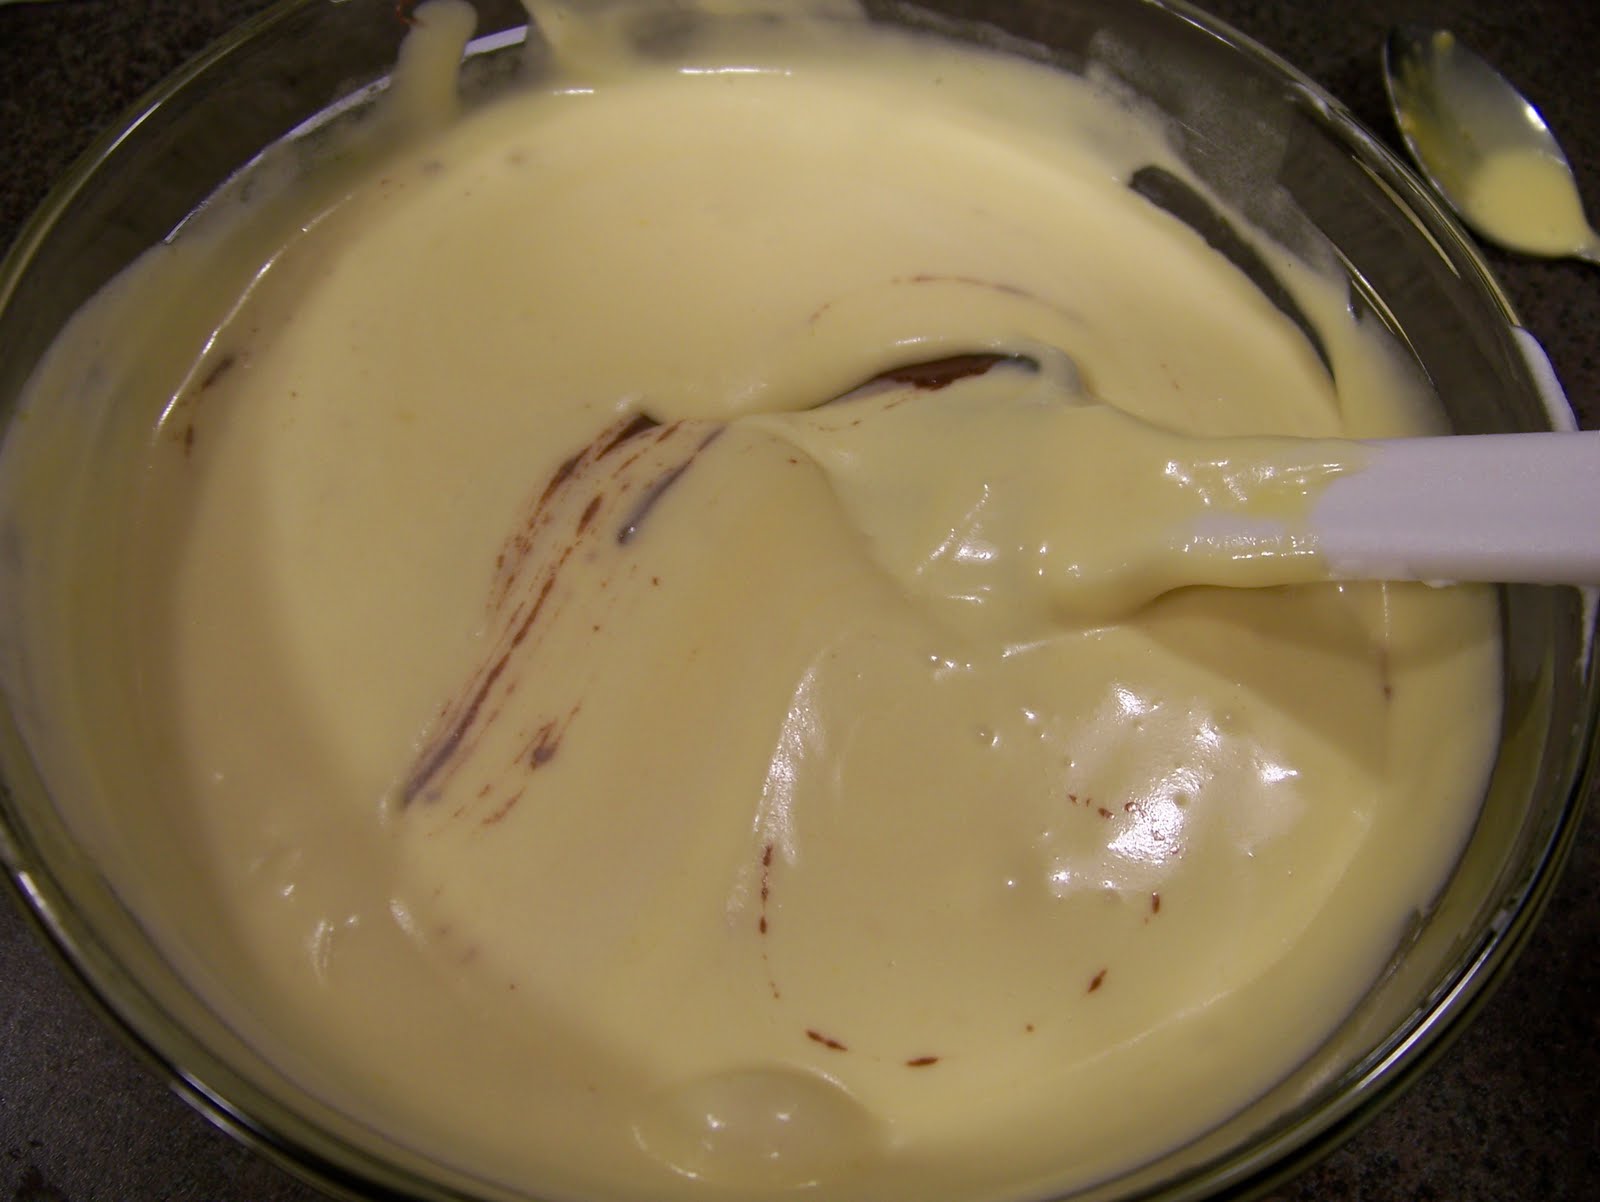
Drop spoonfuls of the Nutella over the custard mixture and gently fold until just incorporated but still chunky. Spoon the mixture onto the prepared crust.

Fold the overhanging parchment paper over the custard and freeze at least 8 hours or up to 3 days.
When ready to serve, just pull back the sides of the parchment paper....


Use the "tabs" on the ends as handles and the dessert should come right up out of the pan. Peel the parchment paper off of the dessert.


The beautiful dessert....


Cut into slices and serve!!

Saturday, June 26, 2010

Pasta Salad and a Upcoming Review

The semi-homemade has been my friend for awhile now...makes life a little easier;)
This salad is from a kit-Suddenly Salad-I just added a few ingredients.
This salad was very flavorful and summerey-just using stuff I had on hand!
I made it and took it to the lake one day last week-now that we finally are having Summer weather:)

For the recipe:

1 box of Suddenly Salad
Make and Mix according to package directions.

1 marinated and grilled chicken breast-chopped
1/2 c. sliced black olives
1/4 c. thinly sliced red onion
Salt and Pepper

Throw this in with the above mix and chill.

Then pack up and take it on a picnic;)


Now on to the upcoming review-I was recently contacted by CSN stores and have an opportunity to review one of their products! How awesome is that!! Yay:) The CSN stores have over 200 online stores where you can find almost anything from a sofa to a cookies sheet!!
So now I have the "chore" of picking something to review;)
Look for the review in a post coming soon!

Hope ya all have a great weekend!:)

Tuesday, June 22, 2010

Hot Weiners Rhode Island Style W/ Beer Battered Onions Rings

Have you ever watched Guy Fieri on Food Network?? Love him!!! :) He always has the greatest looking and tasting food and he is great to watch! Anyway, Holly and I made these quite a while ago (back when i was living in WA and we would get together every Saturday night and make something new and exciting together!!). There aren't any step by step pics but the pics are making my mouth water.....


The dogs... sound a little crazy but are actually very good and something different besides the normal chili dog! Basically it is ground beef, onions and lots and lots of different spices including allspice, cinnamon, curry and many more!! Check out the printable recipe for all the ingredients!

Don't forget about the Beer Battered Onion Rings... so good!! They are pretty easy to make but you do need to let them soak in buttermilk for 1 hour so plan ahead! (i always forget!!)

Another angle...
Give 'em a try... you know you want to!!! LOL!

Sunday, June 20, 2010

Caramel Cake

Happy Fathers Day!!

This is one of the most decadent cakes ever!!
So I had to make it for Fathers Day!
I've made a Caramel Cake before but it was kinda lacking the right punch of caramel flavor so when I saw this one posted over at Our Best Bites I thought I'd give it a try.
Gotta warn you though-This is a very, very sweet cake!
Oh and the Hubby loved it!;)

For the Cake:
1 yellow cake mix-they recommend Duncan Hines-I used my favorite..Betty Crocker:)
1 8 oz. container sour cream
1 c. oil
3 eggs
1 tsp. butter flavor
1 tsp. vanilla extract
1 tsp. almond extract

Preheat oven to 350*. In a large bowl, combine cake ingredients and beat on med-high for 3 mins. While they used a 9x13 in. pan I used 9 in. round pans-I like a layered cake:) Pour batter into pan of choice-you could totally do cupcakes if you wanted-Yummy! Bake according to box directions. Once baked allow to cool. While cooling, prepare the caramel frosting.

Frosting:

1 c. butter
2 c. firmly packed brown sugar-I used half dark brown and half regular brown
1/4 c.+2 T. whipping Cream
2 t. vanilla
3-3/4 c. powdered sugar
About 1 c. toasted, chopped pecans-I didn't use these hubby doesn't care for them.

In a medium saucepan, melt the butter over medium heat. Add the brown sugar and , stirring constantly, bring the mixture to a boil. Carefully stir in the whipping cream and vanilla {be careful of splatters-it's HOT!} and then bring this mixture to a boil. Remove from heat and allow to cool for about 1/2 hour. Transfer the mixture to a large mixing bowl and sift in the powdered sugar. Beat on high for 2-3 mins or until creamy and fluffy. If you do a layer cake press down on the cakes while still hot. You can do it in 2 layers if you like or you can slice the cake in halves to make 4 layers, which is what I did. Spread the icing over the cake and sprinkle with chopped pecans.

Soooo Yummy!
Enjoy with a nice hot cup of strong coffee!

Thursday, June 17, 2010

Patty Melts

I have always loved Patty Melts but for some reason never make them at home. So when i came across the recipe for a healthier version of a Patty Melt in the Food Network Magazine i decided to give it a try! The recipe is a little different than the traditional Patty Melt but still really nummy!!


Waiting to be devoured.. the burger was made with turkey and ground beef... makes you feel a little better about eating it!!


To get started, heat olive oil in nonstick skillet and add onions. Cook about 2 to 3 minutes or until soft.

Push the onions to one side of the pan, add the mushrooms and cook until browned, about 2 minutes.


Season with salt and pepper, then mix the mushrooms and onions together and cook until the onions are golden, about 10 more minutes.

Add the vinegar and 2 tablespoons Worcestershire sauce. Transfer the mixture to a bowl and keep warm.


Meanwhile, mix the turkey, beef and the remaining Worcestershire sauce in a bowl. Shape into 4 equal-size patties.


Either cook the patties on a grill or wipe out the skillet that was used for the mushrooms and onions and add 1 tablespoon olive oil. Over medium-high heat cook until browned on the bottom, about 4 minutes. Flip and cook through, about 1 to 2 more minutes.


Divide the onions and mushroom among 4 bread slices....


Top with a slice of cheese, a patty, another slice of cheese and another slice of bread. Wipe out the skillet; add another 1 tablespoon olive oil and place over medium heat. Cook the sandwiches in two batches until the bread is toasted and the cheese melts, 1 to 2 minutes per side, adding more olive oil if needed.


Lastly... enjoy!!! We did! :)

Tuesday, June 15, 2010

Easy Peasy Peanut Rolls

~Yumalicious~

These are super easy-but a little time consuming.
I first had these when I was in high school at a bakery in the small town I went to school in.
They called them Mocha Bars- not sure why they have no coffee in them at all!
But they also sell them at the Hy-Vee stores.
They are so good that Michelle found a recipe online years ago called Blarney Stones.
They were quite different though the cake was really dense and the frosting was different-more of a drippy icing than the thicker white frosting. So when I was making this frosting for something else it reminded me of these rolls.
So I thought I would give it a shot:)

So you start off with a box of white cake mix according to original directions.

Once cooled freeze cake about 30 mins, then slice into as many pieces as you want/need.

Next frost all 4 sides and top of each piece of cake.

Roll in chopped salted peanuts to cover.

Like in this very blurry picture above;)

And this is what they will look like when they are all finished-ready to be devoured!;)
Give 'em a try-you won't regret it!!
Enjoy!


Sunday, June 13, 2010

Tomato Bread Salad

If you are gonna have a salad why not have a bread salad;)
So this salad was awesome! Very flavorful, fresh and delicious.
Basil and tomato are a perfect pairing!
So totally summery too:)

Chop Roma tomatoes, yellow pepper, and red onion.

In a screw top jar mix dressing ingredients:olive oil, red wine vinegar, dijon mustard, Italian seasoning, and salt, pepper. Shake well- add to the veggies, stir to coat. Refrigerate over night.
I didn't do this part because I didn't read all the way through the recipe;)

Pre-heat the oven to 400 degrees. Cut up the Ciabatta bread into cubes place on baking sheet and drizzle with olive oil-toss to coat. Bake about 7 to 10 mins, stirring once. Remove and cool-then add to the tomato mixture, along with the basil. Toss to coat and top with the shaved white cheddar cheese.

Yum!
Enjoy this at your next cookout;)

Friday, June 11, 2010

Rhubarb Crisp Bars

Who has rhubarb growing yet??? We have had a lot already and I knew I wanted to make something with it for a dessert that I had to take over to a friend recently. I kind of wanted a crisp but not really a runny crisp and I really didn't want to make a pie. So I went looking online for something that I kind of had in mind..and I found it..Rhubarb Crisp Bars..OOoohh I thought these would be PERFECT!! Just what I had in mind..
DSC_0992
For the crust, combine flour, sugar and salt in a bowl.
DSC_0916
Add the butter and using a pastry cutter, work ingredients until well combined. The dough will be crumbly.
DSC_0917
Press crust into an 8×8 glass pan with your fingers or the bottom of a measuring cup
DSC_0920
For the rhubarb filling, combine rhubarb, sugar and cornstarch in a bowl and dump over the crust, spreading until even.
DSC_0929
Last, for the crumb topping, combine flour, oats, brown sugar, baking powder and salt in a bowl. Cut butter into pats and with your hands, work the butter into the dry ingredients until it is combined and crumbly.
DSC_0931
Then break mixture into little crumbs over the top of the rhubarb, spreading evenly over the top. (Crumb topping courtesy of the Pioneer Woman and the apricot bar recipe.)
DSC_0935
Bake for 40 minutes if you have fresh rhubarb; if frozen, bake for 60 minutes. When entire top is nice and golden brown, pull it out of the oven and dig in immediately! Serve with a big scoop of vanilla ice cream if you’re into that.
DSC_0997
Enjoy!
Printable Recipe